Viser opslag med etiketten tutorial. Vis alle opslag

lørdag den 24. maj 2014

Doll Makeup - Inspiration from BJD's

Hi guys.

It has been almost two months since I was last active here. I've been busy and stressed out to the max, but holidays are coming closer and giving me some extra time for a little blogging. 
I thought I'd never come to do it, but here's the first part of my doll makeup series!!! 

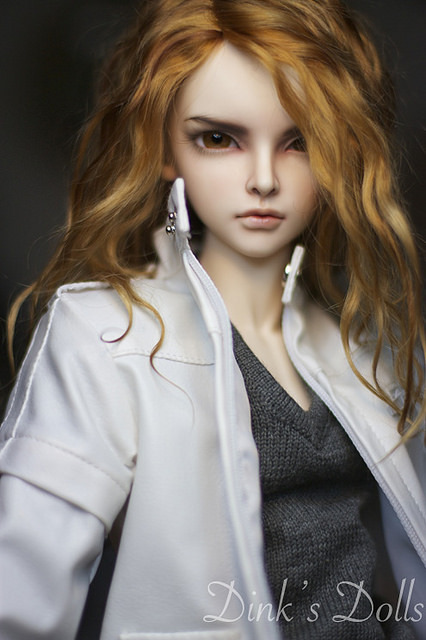
Photo I got inspired from:
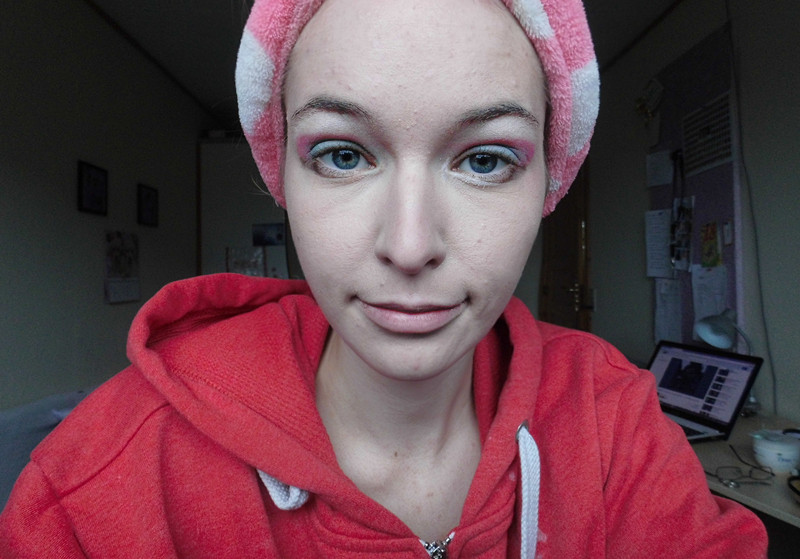
My try: 

As you can tall it's not "exact", but more inspired from the dolly girls.


I felt this was too cute and not dramatic enough, so I tried adding a filter. I'm not sure if it helped any though hahah


I don't have dolly features, I'm aware of that. But being inspired from it was really fun.

Face: Foundation, powder and concealer for a flawless complexion. I contoured my entire face. Nose, chin, cheekbones and forehead. I highlighted my nose, undereye area, chin, small part of forehead. No blush because her dolly face looked out-washed and I couldnt see any blush on my inspiration.

Eyes: I applied shadows in shimmering white, silver and black. I darkened my brows and arched them, and applies falsies halfway to open my small eyes. 

Lips: I covered them in concealer and applied my Etude House tint on the middle for an ombre-effect. Then applied a lipliner to match it and fade it out. I liked the lips the most!


My hair was being really bitchy. Wouldn't stay, wouldn't curl, wouldn't work with me. So annoyed! 

I tried focusing on eyelashes, brows and mouth because I found those to be her most important features. 

Products used:
Max Factor Whipped Cream foundation Light Ivory 40 (foundation)
Chanel Double Perfection Compact 03(powder)
Nilens Jord Duo Concealer (concealer and highlighter)
Nilens Jord Eyeshadow 626 (ccontouring and brows)
Christian Dior 5-colour eyeshadow, white colour (highlight and eyeshadow)
Lancôme Hypnôse Doll Eyes, white colour (eyeshadow)
Coastel Scents 88 Palette, silver and black colour (eyeshadow)
Rimmel Waterproof Gel Eyeliner (eyeliner)
Dollywink Mascara long (mascara)
Taiwanese Lashes (fake eyelashes)
Etude House Rosy Tint Lips (lipstick)
Maybelline Colorsensational 440 Coral (lipliner)

I hope you enjoyed this look. More post are to come, I'm working hard on getting them published as soon as possible! ♥ 


lørdag den 28. september 2013

2/2 Tutorial ~ Dolly Ulzzang Look

Hello again! 

This is my second ulzzang-tutorial. You can see the first tutorial "naturel ulzzang" here.

This time I am going for a more childish and cute look! The look would be awesome and fully complete with a pair of circle lenses, but my eyes cannot stand any kind of lenses. 

I recommend using circle lenses for this look if you have the possibility!
The most important things about this look is having very huge eyes, and facial features that resembles a doll. Very pale porcelain skin and a petite nose and mouth is important as well, and big hair, or maybe a wig if you dare! Wear some cute pastel clothes, and you're good to go. 


I have already explained what "ulzzang" means in my former post, so no need to do the explanation again. Saves both time and space! 

Here is just a quick example of a naturel/mature ulzzang (left)and a dolly ulzzang (right) 


This tutorial will be less detailed, because it's quite simple. 
As usual we start from being bare-faced! 

Yay! What a sight! (Warning: Ugly view!) 


Apply BBcream all over, and dot concealer whereever needed. Apply powder in the T-zone area (forehead, nose, chin)

Eyes: 


Apply a pastel-pink on your eyelid and extend the line a little. Apply black shadow underneath your eye, drag it downwards for the puppy-eye effect. Apply a bright glitter-white eyeshadow in innercorner and under the lashline, and finish off making your aegyo-sal with brown.


Drag your liquid eyeliner down following the black eyeshadow. Put on mascara on your lashes. Cut a pair 1/3 naturel lashes and glue them to the extended line. This will make your eyes look a lot bigger!


Face: 


Apply pastel pink blush on the apples of your cheek (pink dots) and contour your chin and nose small as the red lines show on the picture. You do not need to highlight, but that's all up to oneself. 


Lips: Lips are the same gradiant as used for the first tutorial, but with a more pink colour. 

All done!
Also don't forget that it's more than okay to photoshop your pictures. Dolly ulzzangs are known to photoshop their pictures unhumanly, but adorable. So don't be jealous of their enormeos eyes or non-existing noses... It could be photoshop, it could be makeup! Final result:


Bye for now! 
(If you are interested in any of the used products comment below)


tirsdag den 17. september 2013

Mini-Makeup Tutorial; Fairy makeup

Hello! This will be my first official post on here! 

This is a mini-mini and super easy tutorial inspired by beautiful fairies. I love fairytales, and pastel-colours and fairies goes into one! The tutorial is made really simple, and nothing about it is too detailed, so everyone can follow up. I plan to make more tough and detailed tutorials in the future. 
However, what little girl haven't wanted to be a fairy? Become a fairy with a little makeup, and pow! Maybe there come some special powers too? Hu-hu! ~

Here is me, without makeup. I look kinda like a boy, maybe a bit of a zombie. I look like a lazy bum with my hubby's shirt and a fluffy hairband. Either way, not very "fairy". Let's do something about that! 


Now how do an ordinary girl become a fairy like so? 
Oh yeah, faires do sit on their blue chairs, with a pc in the background! Screw nature, right?! Kidding, kidding. I made this tutorial inside, and it rained all day. I planned to take some photos in the nature, but all the rain would most likely have ruined my makeup (and not to mention my camera!).

Here starts the tutorial. I will list all used products at the end. 
Always start with a bare face. Use a BBcream for flawless skin. It makes a huge difference, see? 

Before:


One layer of BBcream:

Faries are flawless creatures, so use a concealer to cover up anything your BBcream didn't. For me it's a few pimples, dark circles, and redness around mouth and nose. 

Set everything in with a powder, or a bbpowder. I recommend using a high quality brush for powder. I'm using Too Faced Teddy Bear Brush, and it works wonders! (While looking cute as well!)

All done with the base. Now you have a clean "canvas" to start working with. 


I made the eyeshadow ultra simple. You don't need very many shadows, however you need pastel eyeshadows in cute colourful... colours. 
1. Start by applying a white shimmery eyeshadow all over your eye area. 
2. Use a blending brush and a peach-pink colour at the outer corner and apply almost in a V-shape. Blend the edges. 
3. With an pastel blue (or electric blue for more pop) apply with your fingers onto your lid. Blend it into the pink. 
4. Apply a brown shade underneath the lashline, from outercorner to middle of the eye. 
6. Apply shimmery white shadow in your inner corners

Sorry that I look high on the picture. My eyelid folded a weird way, since I have uneven eyelids and make me look drunk hahah ~ Either way, that's how your eyeshadow should end up looking.


Now for counturing! Counturing is like a free temporary plastic surgery. It's amazing! Use a matt (NOT shimmery or light reflecting) brown eyeshadow/bronzer/whatever and contour the sides of your nose, cheeks and chin. Apply the same shade onto your eyebrows (unless your hair is another colour of course!) 

Also, apply a pastelpink blush on the apples of your cheeks. 

Time to line your eyes. Use a liquid liner and extend your liner downwards for a puppy-eye effect. It will work as a guideline for your false eyelashes. 


Choose a naturel pair of eyelashes and glue them as close to your naturel lashline as possible. Wait about 30 seconds for the glue to dry before sticking them onto your eye. 


Last, but not to forget, apply a babypink lipstick. I go a little over my naturel upperlip, since my upperlip is a lot smaller compares to my bottom lip. Make sure to conceal any blemishes around your mouth first, and apply lipcalm! 


Add your wig, put on a cute pasteldress, add sparkles and you're all done! 


Products used: 

- SKIN79 BB cream in light
- Rimmel Wake Me Up Concealer in ivory
- L'oreal BBpowder 
- 88 original eyeshadow pallette (pink, blue)
- Rimmel eyeshadow #100 Glam Ice (white)
- Nilens Jord eyeshadow #626 (brown, contouring)
- COOLCOS Blush #05 
- Rimmel Glam'Eyes #001 Black Glamour 
- Lashes are off-brand, bought on Ebay
- (offbrand) EYE waterproof eyelash glue in clear-white
- Dior lipstick #517 Diva (used EOS sweet mint underneath)

That's all for this entry! ~